Touch typing from scratch: what it is, how long it takes, and how to learn it without quitting
An honest guide for beginners: where the hands go, what the training is made of, and why for the first few weeks you will type slower than you do now.
 Dmitry Puzyrev, builds Typing School
Learning to touch type is easier than it looks (and less pleasant than promised). Easier, because it’s an ordinary motor skill, like riding a bike: you don’t need talent, you need short, regular practice. Less pleasant, because for the first few weeks you’ll type slower than you do now, and that’s exactly when most people quit. This guide walks the whole road, so you know in advance where it gets hard and why that’s normal.
What touch typing is, and why speed isn’t the point
Touch typing is typing without looking at the keyboard. Each finger owns a few keys, the hands always rest in the same spot, and over time the fingers find the letters on their own, the way your feet find the pedals in a car.
It’s usually sold on speed: type two or three times faster. Speed does come, but as a side effect. The real change happens to your attention. While your eyes hunt for keys, your head is doing two jobs at once: what to say, and where on earth the semicolon is. Your gaze bounces between the screen and your hands, the thought breaks off, and you notice typos several words later. When the fingers work by themselves, one job is left: thinking. You look at the text, catch a mistake the moment it appears, and type in words rather than letters.
So a good goal for the start isn’t “60 words per minute” but “stop thinking about the keyboard”.
How long it really takes
The internet promises “two hours”, “a week” and “six months”. The thing is, they’re all talking about different points on the same road. There are three of them:
- You know where every letter is. You type slowly, with pauses, but without looking. At 15 to 20 minutes a day this usually takes two to four weeks.
- You touch type in everyday life. Messages, notes, search queries all come out without suffering. Roughly one to two months. The popular estimate, “about a month at ten minutes a day”, refers to this milestone.
- You type fast. The speed at which typing keeps up with thought arrives in three to six months, with no dedicated practice by then: you simply use the skill every day.
For reference: in the largest typing study to date, with 168,000 participants, most people typed 30 to 60 words per minute, and the average came out at 52. So 40 words per minute without looking is a solid working level.
The timelines above are guideposts, not guarantees. Some people go faster, some slower, and it hardly affects the end result.
About the dip at the start
For the first few weeks you’ll type slower than you do now with two fingers. This is the most unpleasant spot in the whole process. You can’t get around it, you can only know about it in advance. That’s why the best time to start is when you DON’T need to type a lot of text urgently in the next two or three weeks.
What you need before you start
A keyboard. Any physical one you already have, laptop included. Mechanical, ergonomic or blank keycaps aren’t required and make no difference to learning. One thing to check: the F and J keys should have small bumps. That’s how the fingers find their place by touch.
A layout. If you write in two languages, start with the one you type more. Add the second layout once the first is automatic. It will go noticeably faster: the fingers already know how to move, only the new letters on the same keys are left to learn.
Your desk. A chair at a height where the elbows bend at roughly a right angle and the feet are flat on the floor. Screen at eye level or slightly below. Keyboard straight in front of you, not off to the side. And the hands: wrist straight, the hand continuing the line of the forearm, neither bent up nor sagging down.
The home position, and why it’s set up that way
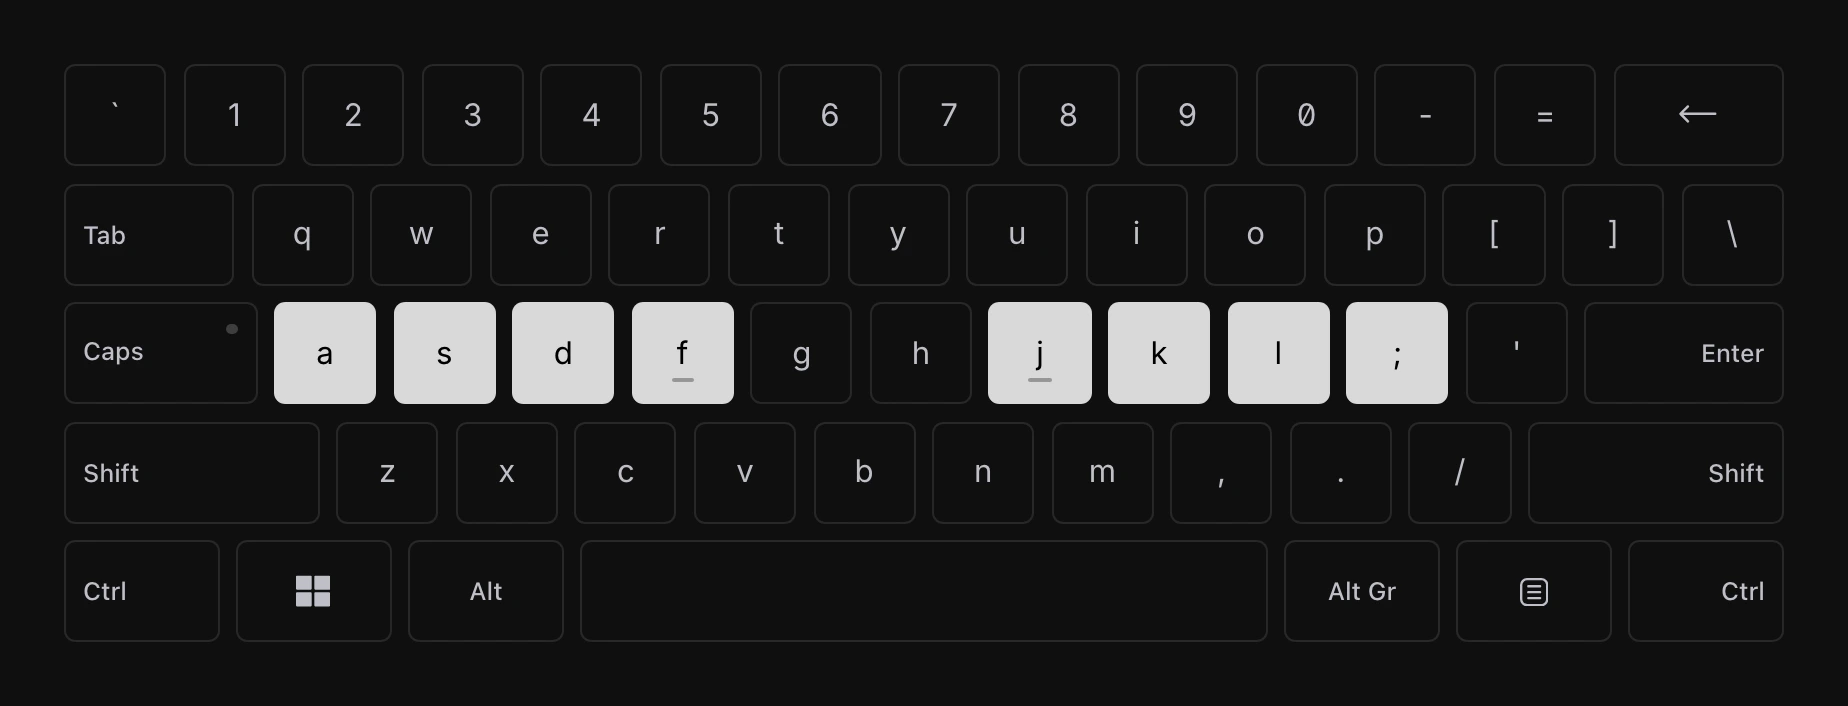
Eight fingers rest on the middle row: the left hand on ASDF, the right on JKL and the semicolon key. Index fingers on the keys with the bumps, thumbs over the space bar. This is the home row: every finger leaves it to reach a letter and comes back to it.
Each finger owns a slanted column, up and down from its home key. The left pinky covers Q, A, Z; the ring finger W, S, X; the middle finger E, D, C. The index fingers are the strongest and most agile, so they get two columns each: R, F, V and T, G, B on the left, Y, H, N and U, J, M on the right. The right hand mirrors the left, except the pinky has more work: the whole right edge of the keyboard is its territory.
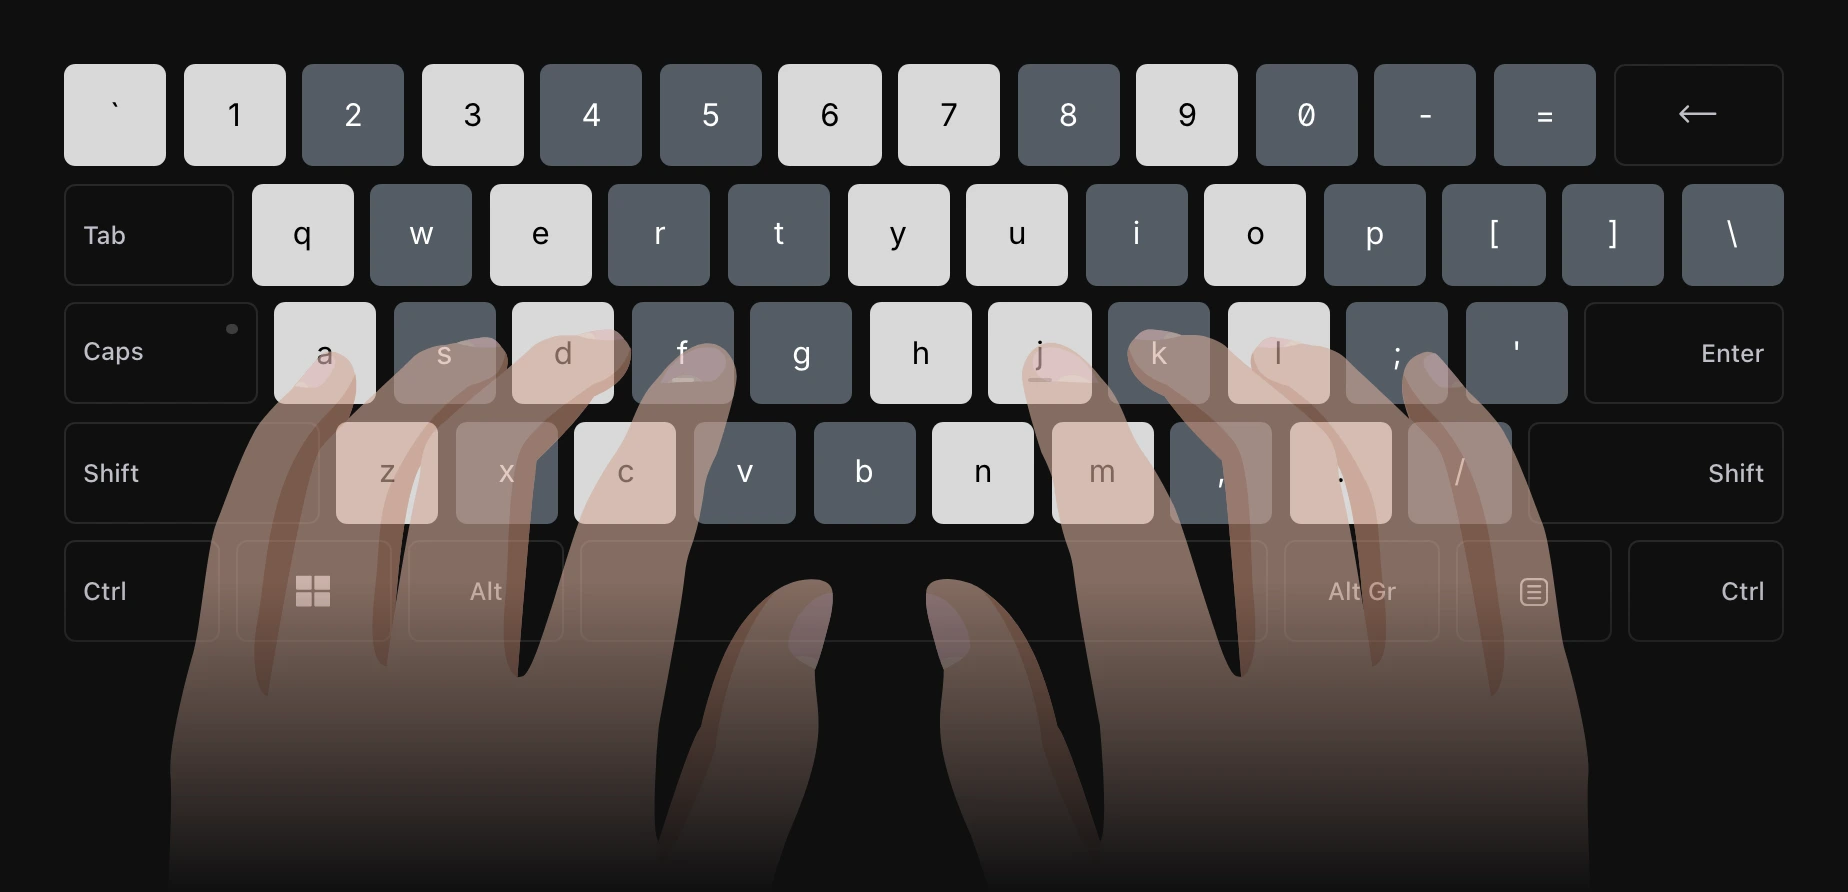
Why this way? No finger has to reach far, the hands barely move, and since the hand is always in the same place, the path to any key is always the same movement. That repetition is what turns into muscle memory. When the hand wanders around the keyboard, there’s nothing to memorize: the route to a letter is new every time.
The chart isn’t dogma, though, just a good default. Three things really matter: eyes on the screen, many fingers at work, and consistency, where one key is always hit by the same finger. The easiest way for a beginner to get all three is to learn the standard chart as is. If some key later turns out awkward, you can deviate, but deliberately and for good, not differently each time.
What the training is made of
Courses differ a little in order, but the logic is the same everywhere: first the keys under the fingers, then the ones you reach for; first single letters, then combinations, then real text.
The home row. You start with the two keys under the index fingers, then bring in the other fingers. Few words can be made from these letters, so the drills look like gibberish, and that’s fine: you’re learning movements, not words.
Top and bottom rows. A finger goes up or down and returns home. The bottom row is usually harder: the movement is less natural. A good sign in a course: at the end of each row there are lessons that mix everything learned so far.
Weak fingers. The pinkies and ring fingers have hardly worked before and will lag behind. Everyone has this. They need extra load.
Letter combinations. An important shift happens here: the fingers start remembering not keys but sequences. Frequent pairs like “th” or “an”, with the letters under different hands, quickly merge into one motion. Harder are the pairs where both letters sit on the same finger, and English has plenty of those among its most common ones: “ed”, “de” and “ce” are all on the left middle finger, “un” and “my” on the right index. If you keep stumbling on some short word, that’s most likely the reason, not you.
Common words. The hundred most frequent words make up a huge share of any text. Once they come out in one motion, speed jumps noticeably.
Shift and capitals. The rule: Shift is pressed by the pinky of the opposite hand. A capital A needs the right Shift, a capital L the left one.
Punctuation. The comma and the period, the two most common marks, sit on the bottom row without Shift, under the right middle and ring fingers, so they come easy. The rest hide behind Shift: the question mark, the colon, quotation marks. So they’re learned after Shift, and the question mark will annoy you longer than any letter: two pinkies work on it at once.
Real text. Actual sentences with capitals and punctuation. This is where the skill first feels like a skill.
Numbers. Last of all: the number row is the farthest reach for the fingers and the least needed. Plenty of confident touch typists never learned it and live just fine.
How to practice
Fifteen to twenty minutes a day, every day. A motor skill settles in between sessions, not during them, so seven short sessions a week beat one two-hour session on Sunday. Besides, after half an hour attention drops, the hands tire, mistakes multiply, and you start practicing the mistakes.
Accuracy over speed. Keep at least 95% correct keystrokes and don’t speed up until you do. This isn’t overcaution: fixing mistakes costs so much that whoever slows down for accuracy ends up typing faster. Besides, every wrong keystroke is a small rehearsal of the wrong movement. But don’t demand 100% of yourself either: chasing perfection gives you tense hands.
Don’t look down. At all. Forgot where a letter is? Recall it from the chart on the screen or feel your way from the home row. Slowly, but blind. One glance at the keyboard saves a second and cancels the point of the exercise. If your eyes keep drifting down on their own, cover your hands with a towel.
Type softly. A key doesn’t need to be pushed to the bottom, let alone hammered. Tense hands tire faster and miss more often.
Measure your speed before the first lesson. Take the test and write the number down. In a month you’ll need it to see that you’ve climbed out of the dip.
Typical mistakes of the first two weeks
Peeking “only for the hard letters”. The hard letters are exactly the ones you need to learn by touch, otherwise they stay hard forever.
Chasing the speed number. The counter begs to be pushed, but speed means nothing in the first weeks. Watch accuracy.
Practicing in bursts. Three days of an hour each, then a week off. By the next round half is forgotten, and the feeling “I’m not getting it” sets in. You are getting it, just not this way.
Fingers not coming home. You hit a letter on the top row and leave the finger there. Three keystrokes later the hand has drifted and every key misses. Lost? Feel for the bumps on F and J and start over.
Helping out with a strong finger. The index finger will happily do the pinky’s job. Don’t let it: it’s faster now, but you’ll have to relearn later.
Two ways of typing at once. Until you know all the letters, you’ll have to type the old way in everyday life, that’s unavoidable. But as soon as all three rows are learned, switch to touch typing everywhere, messengers included. It will be slow and annoying for about a week. If you put it off, the old habit will win every time you’re in a hurry.
If your hands get tired or hurt
Mild fatigue in the pinkies and ring fingers in the first days is normal. Pain, numbness and tingling are not. Check three things: the wrists aren’t bent up or pressed against the edge of the desk, the hands aren’t twisted toward the pinkies, you aren’t hammering the keys. Shorten the session and take breaks. If it doesn’t go away, see a doctor.
How to tell it worked
Not by the number in a test. The signs are different, and one day you’ll definitely notice them. You’ll notice you can’t remember the last time you looked at the keyboard. You’ll notice you feel a typo in your fingers before you see it on the screen. You’ll notice you type while looking at the person you’re talking to.
You think about what you’re writing, not how.
If you want a number: 30 to 40 words per minute at 95% accuracy or better is the level at which touch typing is already more comfortable than any way you typed before. From there, speed grows on its own, because now every email and every message is practice.
Source of the speed and error data: Dhakal, Feit, Kristensson, Oulasvirta. Observations on Typing from 136 Million Keystrokes. CHI 2018.